javaniceday.com

  • Home
  • AboutAbout me
  • Subscribe
  • SalesforceSalesforce related content
  • Node JSNodejs related content
  • JavaJava related content
  • Electric Vehicles
  • Autos Eléctricos
  • Estaciones de carga UTE
  • Mapa cargadores autos eléctricos en Uruguay
  • Implement a wait sync with a promise in TypeScript

    July 31st, 2021

          
      waitMs = async (millis: number) => new Promise((resolve) => setTimeout(resolve, millis));
    
      waitSeconds = async (seconds: number) => new Promise((resolve) => setTimeout(resolve, 1000 * seconds));


    await waitMs(10000);
    
    await waitSeconds(10);


    Photo by Kai Pilger on Unsplash

    Share this:

    • Click to share on X (Opens in new window) X
    • Click to share on LinkedIn (Opens in new window) LinkedIn
    • Click to share on Reddit (Opens in new window) Reddit
    • Click to email a link to a friend (Opens in new window) Email
    Like Loading…
  • How to trigger a Lambda Function from S3

    July 27th, 2021

    If your application requires you to be able to trigger a Lambda function from S3, it is possible to do so using the Amazon Simple Storage Service (Amazon S3). With Amazon S3, you can set up an event notification on an Amazon S3 bucket that will send a notification to an AWS Lambda function when an object is created or deleted. In this post, we will walk through the steps to trigger a Lambda function from S3.


    Sometimes we need to let a Lambda know when a new file was created in an S3 bucket. That’s can be the case when we have a data lake and we want to process those files. But beware, when we talk about a data lake, we mean a huge amount of data so we shouldn’t start processing immediately a file is written since our capacity can be limited. In that case, we should use a queue mechanism but that is out of the scope of this post so Let’s concentrate on our specific problem: trigger a Lambda from S3.

    We could do this from the console using point and click but as a good practice, let’s automate this provisioning with Cloudformation. This way we will be able to move our code across different accounts and deal with environments easily.


    The Cloudformation approach can be slow at the beginning but once you get familiar with it, you will accelerate your dev process. Another big advantage of Cloudfromation is versioning. Since our output is a yml file, it can be easily add it to a github repo. Thus, tracking changes becomes a piece of cake. However, you may resolve your problem first from the console and then translate it to Cloudformation

    Let’s do it step by step, building small pieces of Cloudformation components, deploy them and then put all together in one file.

    Have in mind this is not a production-ready solution. Probably you will have to make your own customizations so take this as a starting point.


    AWSTemplateFormatVersion: '2010-09-09'
    Transform: AWS::Serverless-2016-10-31
    Description: >
      lambda-s3-trigger
    
      Sample SAM Template for lambda-s3-trigger
    
    Globals:
      Function:
        Timeout: 3
    
    Parameters:
      Environment:
        Type: String
        Description: Environment name. Example, staging, dev, prod, etc.
    
    Resources:
      MyFunction:
        Type: AWS::Serverless::Function
        Properties:
          CodeUri: hello-world/
          Handler: app.lambdaHandler
          Runtime: nodejs12.x
          Role:
            Fn::GetAtt:
              - "MyRole"
              - "Arn"
        Tags:
          Name: !Sub "${Environment}-my-function"
    
    
      MyRole:
        Type: 'AWS::IAM::Role'
        Properties:
          AssumeRolePolicyDocument:
            Version: 2012-10-17
            Statement:
              - Effect: Allow
                Principal:
                  Service:
                    - lambda.amazonaws.com
                Action:
                  - 'sts:AssumeRole'
          ManagedPolicyArns:
            - arn:aws:iam::aws:policy/service-role/AWSLambdaBasicExecutionRole
          Policies:
            - PolicyName: AccessToS3Notifications
              PolicyDocument:
                Version: 2012-10-17
                Statement:
                  - Effect: Allow
                    Action:
                      - 's3:GetBucketNotification'
                      - 's3:PutBucketNotification'
                      - "s3:GetObject"
                    Resource: !Sub 'arn:aws:s3:::${AWS::AccountId}-${Environment}-my-bucket'
    
      MyBucket:
        Type: AWS::S3::Bucket
        DependsOn:
          - MyFunction
        Properties:
          # the bucket name has the account as a prefix since it has to be unique globally at AWS level
          BucketName: !Sub "${AWS::AccountId}-${Environment}-my-bucket"
          NotificationConfiguration:
            LambdaConfigurations:
              - Event: 's3:ObjectCreated:*'
                Function: !GetAtt MyFunction.Arn
    
      PermissionForEventsToInvokeLambda:
        Type: AWS::Lambda::Permission
        Properties:
          FunctionName: !GetAtt MyFunction.Arn
          Action: "lambda:InvokeFunction"
          Principal: "s3.amazonaws.com"
          SourceAccount: !Ref 'AWS::AccountId'


    Build and deploy:

    $ sam build
    $ sam deploy --guided

    Share this:

    • Click to share on X (Opens in new window) X
    • Click to share on LinkedIn (Opens in new window) LinkedIn
    • Click to share on Reddit (Opens in new window) Reddit
    • Click to email a link to a friend (Opens in new window) Email
    Like Loading…
  • How to make Load and Smoke testing with Artillery

    May 24th, 2021

    Overview

    Artillery is a CLI tool installed easily through npm

    Artillery is a modern load testing and smoke testing solution designed for cross-functional teams that run microservice-based systems on AWS and rely on CI/CD to ship at high velocity

    We are going to see how to install it and run some load tests from our computer

    System requirements

    Artillery is a CLI application that is installed on your computer. Artillery runs on Windows, MacOS, and Linux systems with Node.js v12 or above installed.

    Installation

    To install global in your computer

    
    $ npm install -g artillery
    
    If you get this error checkPermissions Missing write access to /usr/local/lib/node_modules just add sudo so install Artillery like this sudo npm install -g artillery

    Check installation

    
    $ artillery dino
     ------------
    < Artillery! >
     ------------
              
               
                ..`
                ;:,'+;
                ,;;,,;,
                  #:;':
                  @';'+;
                `::;''';
                '; ,:'+;;
      `,,`      .;';'+;'
     ;   `'+;;;::';++':,;
            `+++++##+'';#
               .;+##+''';
                '+##'''#'
               ++# +;'.##
               ##, `: .#,
              :#      '+
              #.      '
              #       +
             :+       #'
             #+`       ';.
    

    Check version

    
    $  artillery --version
            ___         __  _ ____                  _
      _____/   |  _____/ /_(_) / /__  _______  __  (_)___  _____
     /____/ /| | / ___/ __/ / / / _ / ___/ / / / / / __ /____/
    /____/ ___ |/ /  / /_/ / / /  __/ /  / /_/ / / / /_/ /____/
        /_/  |_/_/   __/_/_/_/___/_/   __, (_)_/____/
                                        /____/
    
    ------------ Version Info ------------
    Artillery: 1.7.2
    Artillery Pro: not installed (https://artillery.io/pro)
    Node.js: v14.15.0
    OS: darwin/x64
    --------------------------------------
    

    Run quick test

    20 virtual users that send 100 requests GET each of them

    
    $ artillery quick --count 20 --num 100 https://yoursite.com
    All virtual users finished
    Summary report @ 23:21:14(-0300) 2021-05-19
      Scenarios launched:  20
      Scenarios completed: 20
      Requests completed:  2000
      Mean response/sec: 26.94
      Response time (msec):
        min: 28
        max: 912
        median: 233
        p95: 594
        p99: 720.5
      Scenario counts:
        0: 20 (100%)
      Codes:
        200: 2000
    

    See the Artillery’s command line reference

    Share this:

    • Click to share on X (Opens in new window) X
    • Click to share on LinkedIn (Opens in new window) LinkedIn
    • Click to share on Reddit (Opens in new window) Reddit
    • Click to email a link to a friend (Opens in new window) Email
    Like Loading…
  • Get Visualforce usage stats from VisualforceAccessMetrics

    May 22nd, 2021

    If you’re an administrator of a Salesforce org, you need to know how your users are interacting with your Visualforce pages. With Salesforce VisualforceAccessMetrics, you can easily get usage stats for your Visualforce pages and track page performance.

    VisualforceAccessMetrics is a tool that lets you see which Visualforce pages are being accessed, how long users are staying on the page, and the page performance status. The data from VisualforceAccessMetrics can be used to optimize page performance and provide a better user experience.

    If you want to know how frequently your Visualforce pages are accessed, you just have to run a simple query on VisualforceAccessMetrics:

    SELECT ApexPageId,DailyPageViewCount,Id,MetricsDate 
    FROM VisualforceAccessMetrics

    More options

    SELECT ApexPageId, MetricsDate, TotalTime, AverageTime, TotalRequests, UniqueUsers
    FROM VisualforceAccessMetrics
    WHERE MetricsDate = TODAY

    Have in mind that query will return stats from the latest 90 days

    Pageviews are tallied the day after the page is viewed, and each VisualforceAccessMetrics object is removed after 90 days.

    But beware, that query could return deleted pages.

    To fix that, let’s tweak the query to:

    SELECT Id, Markup, Name, NamespacePrefix 
    FROM ApexPage 
    WHERE Id IN (SELECT ApexPageId FROM VisualforceAccessMetrics)

    Now the query will return only existing pages.

    Share this:

    • Click to share on X (Opens in new window) X
    • Click to share on LinkedIn (Opens in new window) LinkedIn
    • Click to share on Reddit (Opens in new window) Reddit
    • Click to email a link to a friend (Opens in new window) Email
    Like Loading…
  • Magic Mover for Notes And Attachments to Lightning Experience

    May 21st, 2021

    Why convert attachments to Salesforce files?

    Files are more versatile and provide better functionality than attachments. Attachments can only be
    attached to a single record, while files:

    • Can be shared with multiple records and users
    • Appear in Files home and can be added to Libraries
    • Track multiple versions
    • Provide file previews of documents, images, PDFs, and more

    Salesforce files are optimized for Lightning Experience.
    Attachments can’t be uploaded in Lightning Experience. Attachments may be visible (and read-only) in
    Lightning Experience, but only if the org admin has enabled this on each page layout.

    Why convert classic notes to enhanced notes?

    Enhanced notes are more versatile and provide better functionality than classic notes. Classic notes can only be attached to the records of one object. Enhanced notes, however, can be added to multiple objects, like accounts, opportunity, contact, and lead.
    Enhanced notes are optimized for Lightning Experience. They can also be used in Salesforce1.

    Install
    Magic Mover for Notes And Attachments to Lightning Experience from Appexchange to do bulk conversions of attachments to Salesforce Files, and classic notes to enhanced notes.

    This package includes 3 tools:

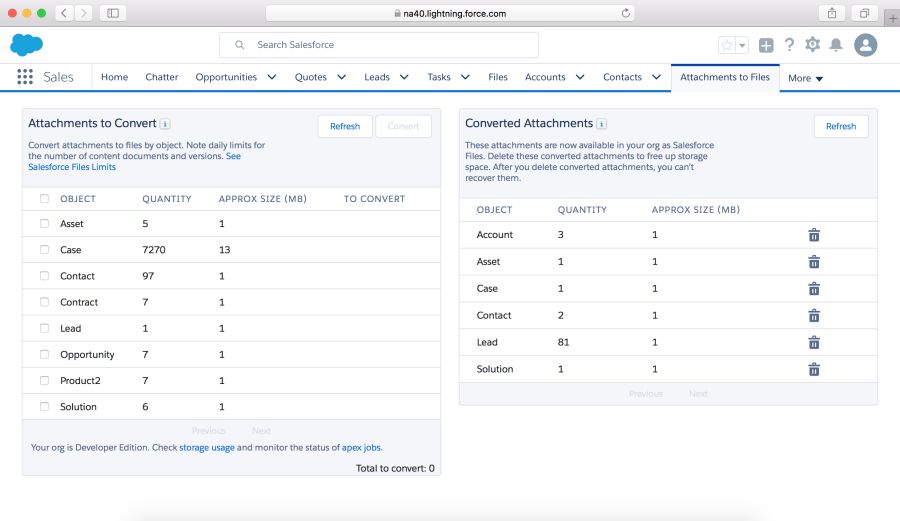
    • Admins use the Attachments to Files tool to do bulk conversion of all the attachments in an org.
    • Admins use the Notes Conversion tool to do bulk conversion of all the classic notes in an org.
    • Admins use the Update Page Layouts tools to update layouts to use the new related lists exclusively.
    Before you install this package, please check out the User Guide, as it contains important installation instructions.

    Conversion of attachments and notes is supported for custom objects and the following standard objects: Account, Asset, Campaign, Case, Contact, Contract, Lead, Opportunity, Product, Quote, and Solution.

    Convert attachments to files because files are optimized for Lightning Experience and provide additional capabilities beyond attachments, including the ability to relate files to multiple records, track multiple versions, and view file previews.

    Convert classic notes to enhanced notes, which are optimized for Lightning Experience and provide additional capabilities beyond classic notes, such as the ability to relate a note to multiple records, and track multiple versions

    If you have comments or feedback, please reach out to us in this Success Community Group:

    https://success.salesforce.com/_ui/core/chatter/groups/GroupProfilePage?g=0F93A000000LgpS

    Resources


    • Magic Mover for Notes and Attachments Guide

    • Magic Mover for Notes And Attachments to Lightning Experience

    Share this:

    • Click to share on X (Opens in new window) X
    • Click to share on LinkedIn (Opens in new window) LinkedIn
    • Click to share on Reddit (Opens in new window) Reddit
    • Click to email a link to a friend (Opens in new window) Email
    Like Loading…
  • How to build a sitemap

    May 19th, 2021

    Why?

    A sitemap is very important if you want to search engines discover and index your site properly.

    Your site is a jungle of HTML, CSS, and JavaScript files so the more you make it easier for search engines, the better.
    A sitemap.xml file is one of the most and easiest ways to implement.

    No matter the language you are using in your site, this is the right way to create a sitemap.

    What is it?

    A sitemap is a file that search engines like Google Bot can understand to index your site. This file contains all the links to your pages in a special (but not so complicated) format.

    It contains also an important information: how often you update that specific page. This way the bot will visit periodically to index the new changes.

    The protocol

    The Sitemap protocol format consists of XML tags. All data values in a Sitemap must be entity-escaped. The file itself must be UTF-8 encoded. See the protocol:
    https://www.sitemaps.org/protocol.html

    Example of a sitemap.xml


    <?xml version="1.0" encoding="UTF-8"?>
    <urlset xmlns="http://www.sitemaps.org/schemas/sitemap/0.9">
      <url>
        <loc>http://www.example.com/</loc>
        <lastmod>2020-01-01</lastmod>
        <changefreq>monthly</changefreq>
        <priority>0.8</priority>
      </url>
    </urlset>


    The above sitemap only contains one page: the home page. Maybe that’s ok because your site only contains a landing page but let see how do we build a sitemap with more pages.

    If you have more pages to index you will write a new block:

    
      <url>
        <loc>http://www.example.com/catalog?item=12&desc=vacation_hawaii</loc> 
        <changefreq>weekly</changefreq> 
      </url> 


    Typically your sitemap XML file will be hosted at the root of your domain: http://www.mysite.com/sitemap.xml.

    For instance, you can see the site map of javaniceday.com here:
    https://www.javaniceday.com/sitemap.xml

    sitemap image

    A sitemap in WordPress

    If you use WordPress or any other CMS, probably you will have several plugins to generate a sitemap.xml
    with one click and automatically every time you create new content.
    Otherwise, you will have to create an algorithm by your own.

    Implementation in Node.js

    See an implementation in Node.js here:
    https://www.javaniceday.com/post/how-to-build-a-sitemap-xml-in-node-js-using-express

    Photo by Jilbert Ebrahimi on Unsplash

    Share this:

    • Click to share on X (Opens in new window) X
    • Click to share on LinkedIn (Opens in new window) LinkedIn
    • Click to share on Reddit (Opens in new window) Reddit
    • Click to email a link to a friend (Opens in new window) Email
    Like Loading…
  • How to render HTML in Jade

    May 19th, 2021

    Overview

    Jade is a Node.js template engine that uses indentation as part of the syntax

    By default, Jade buffers the output so we have to be explicit when we want unbuffered code

    Solution

    If content contains html and you want to render it, use != like this:

          
    div!=content
          
        
    Another example
          
    p!= 'This code is' + ' not escaped!'


    Reference

    Photo by Pankaj Patel on Unsplash

    Share this:

    • Click to share on X (Opens in new window) X
    • Click to share on LinkedIn (Opens in new window) LinkedIn
    • Click to share on Reddit (Opens in new window) Reddit
    • Click to email a link to a friend (Opens in new window) Email
    Like Loading…
  • How to trigger a Lambda with a SQS message

    May 14th, 2021

    Overview

    Take this example as a starting point. This is not a production-ready code, probably some tweaks for permissions will be necessary to meet your requirements.

    AWS resources we need

    • Lambda Function
    • SQS queue
    • Lambda Role
    • SQS Policy

    Lambda Function

          
    let response;
    
    exports.lambdaHandler = async (event, context) => {
        try {
            response = {
                'statusCode': 200,
                'body': JSON.stringify({
                    message: 'hello world',
                })
            }
        } catch (err) {
            console.log(err);
            return err;
        }
    
        return response
    };


    SAM template

    For the sake of simplicity, we are going to allow all operations over de queue but make sure you set the minimum permissions you need
          
    AWSTemplateFormatVersion: '2010-09-09'
    Transform: AWS::Serverless-2016-10-31
    Description: >
      Trigger a Lambda function when writing a message in SQS
    
    Parameters:
      Environment:
        Type: String
        Description: example, staging
    
    Resources:
      MyQueue:
        Type: AWS::SQS::Queue
        Properties:
          QueueName: !Sub "${Environment}-my-queue"
    
      MyFunction:
        Type: AWS::Serverless::Function
        DependsOn:
          - MyQueue
        Tags:
          Name: !Sub "${Environment}-my-function"
        Properties:
          CodeUri: hello-world/
          Handler: app.lambdaHandler
          Runtime: nodejs12.x
          Events:
            MySQSEvent:
              Type: SQS
              Properties:
                Queue: !GetAtt MyQueue.Arn
                BatchSize: 10
            Role:
              Fn::GetAtt:
                - MyFunctionRole
                - Arn
      MyQueuePolicy:
        Type: AWS::SQS::QueuePolicy
        DependsOn:
          - MyQueue
        Properties:
          PolicyDocument:
            Version: "2012-10-17"
            Statement:
              - Effect: Allow
                Principal:
                  Service:
                    - "sqs.amazonaws.com"
                Action:
                  - "sqs:*"
                Resource:
                  Fn::GetAtt:
                    - MyQueue
                    - Arn
          Queues:
            - Ref: MyQueue
    
      MyFunctionRole:
        Type: AWS::IAM::Role
        Properties:
          AssumeRolePolicyDocument:
            Statement:
              - Effect: Allow
                Action: "sts:AssumeRole"
                Principal:
                  Service:
                    - "lambda.amazonaws.com"
            Version: "2012-10-17"
          ManagedPolicyArns:
            - arn:aws:iam::aws:policy/service-role/AWSLambdaBasicExecutionRole
          Policies:
            - PolicyName: AccessAll
              PolicyDocument:
                Statement:
                  - Effect: Allow
                    Action: "sqs:*"
                    Resource:
                      - Fn::GetAtt:
                          - "MyQueue"
                          - "Arn"
                Version: "2012-10-17"


    Deploy

    Build our lambda and template. This will check also the syntax of your template

          
    sam build


    Only for the first time run and follow the steps

          
    sam deploy --guided


    The second time and so on you can execute

          
    sam deploy --no-confirm-changeset
          
    
    Clean up your test AWS resources. Delete unused lambdas, buckets, etc to keep your account organized and the most important: no extra costs

    Resources

    • Tutorial: How to Create, Upload, and Invoke an AWS Lambda Function
    • Getting started with Amazon SQS

    Share this:

    • Click to share on X (Opens in new window) X
    • Click to share on LinkedIn (Opens in new window) LinkedIn
    • Click to share on Reddit (Opens in new window) Reddit
    • Click to email a link to a friend (Opens in new window) Email
    Like Loading…
  • Download and save a file in Node.js

    May 13th, 2021

    Overview

    Download a file in Node.js is pretty straightforward but we have to have into account a couple of things.

    • We are going to make a request and the file will be received in chunks
    • Depending on the size of the file we can do it sync or async with advantages and disadvantages
    • We may require authorization
    We are going to make an implementation using native modules. No third parties.

    The code

    The following code downloads an image from a given URL and stores it in a given path.

    I´m assuming the file is small so take this snippet as a starting point for a production-ready code that meets your requirements.
          
    const https = require('https');
    const fs = require('fs');
    
    /**
     *
     * @param url - the url where we have our file
     * @param fileFullPath - the full file path where we want to store our image
     * @return {Promise<>}
     */
    const downloadFile = async (url, fileFullPath) =>{
        console.info('downloading file from url: '+url)
        return new Promise((resolve, reject) => {
            https.get(url, (resp) => {
    
                // chunk received from the server
                resp.on('data', (chunk) => {
                    fs.appendFileSync(fileFullPath, chunk);
                });
    
                // last chunk received, we are done
                resp.on('end', () => {
                    resolve('File downloaded and stored at: '+fileFullPath);
                });
    
            }).on("error", (err) => {
                reject(new Error(err.message))
            });
        })
    }
    
    const url = 'https://i.imgur.com/wgPdAB6.jpeg';
    const fileFullPath = '/Users/andrescanavesi/Downloads/test.jpeg';
    
    downloadFile(url, fileFullPath)
        .then(res => console.log(res))
        .catch(err => console.log(err));
    
    // to execute this file type:
    // node index.js


    Photo by JF Martin on Unsplash

    Share this:

    • Click to share on X (Opens in new window) X
    • Click to share on LinkedIn (Opens in new window) LinkedIn
    • Click to share on Reddit (Opens in new window) Reddit
    • Click to email a link to a friend (Opens in new window) Email
    Like Loading…
  • 5 reasons to choose WordPress as your content management tool

    May 12th, 2021

    As an Engineer I installed WordPress many times, facing issues such as performance and security. When you host WordPress on your own, security is a headache because it’s a super known tool with lots of exploits so you receive strange HTTP requests all the time, trying to take advantage of some vulnerability.

    To delegate is something you learn over time and to host the things you build is maybe the first thing you should think to delegate.

    WordPress.com offers the possibility to host your instance and depending on your business you have different plans that give you more or less flexibility. I will describe 5 reasons that I consider when I need to implement a CMS (Content Management System) solution.

    1 – Popularity

    One of the first questions many people (including myself) asks is “who is using it?” And the answer is a lot of people! That means that many sites you visit on a daily basis use WordPress

    If you google “WordPress market share” you will get different numbers such as 30%, 40%. I don’t know exactly but at least 1% means a lot of sites.

    And why is so used? Well, continue reading…

    2 – Flexibility

    wordpress

    • Host by your own: you can download a zip file, upload to your host, edit a config file and that’s it.
    • Host in wordpress.com
    • Free and paid themes: you can change how your site looks like with just one click. And the most important: most of the themes are mobile-friendly.
    • Total control when you host it since you have access to the source code
    • Plugins. There are literally one plugin for everything you need and most of them are free or at least a free entry-level.
    • Monetize. Paid or self-hosted you can install ads to monetize your site. In my case my plan allows me to add ads with more or less flexibility.

    3 – SEO

    You may write awesome content but will be kind of hidden if searching bots can’t read your site properly. The good news is most of the themes are SEO friendly so you won’t have to worry about that.

    Anyway, standards and the way Google scans your site changes over time so it’s a good practice to be updated once a year what are the new tags / best practices to be implemented.

    4 – Free and paid plans

    wordpress

    You can have your WordPress site just for free. Just create an account at wordpress.com and start writing your content. Paid plans allow you, among other things:

    • Monetize
    • Your site under your own domain: example.com
    • Install more advanced plugins
    • Edit layouts by adding pre-built widgets

    5 – Awesome editor

    wordpress

    To write content is a pleasure, the Gutenberg editor is awesome!

    You don’t need to touch HTML to make your magic like in old times.

    See more about Gutenberg editor at https://wordpress.org/gutenberg/

    Photo by Fikret tozak on Unsplash

    Share this:

    • Click to share on X (Opens in new window) X
    • Click to share on LinkedIn (Opens in new window) LinkedIn
    • Click to share on Reddit (Opens in new window) Reddit
    • Click to email a link to a friend (Opens in new window) Email
    Like Loading…
←Previous Page
1 … 14 15 16 17 18 … 25
Next Page→

  • LinkedIn
  • GitHub
  • WordPress

Privacy PolicyTerms of Use

Website Powered by WordPress.com.

  • Subscribe Subscribed
    • javaniceday.com
    • Already have a WordPress.com account? Log in now.
    • javaniceday.com
    • Subscribe Subscribed
    • Sign up
    • Log in
    • Report this content
    • View site in Reader
    • Manage subscriptions
    • Collapse this bar
%d