Let’s build a small site in Node.js using Express that will have one protected page
We are going to use express generator to generate some scaffolding. If you didn’t install it just type this command to install it globally but if you already know all this stuff you might skip this step
npm install express-generator -g
Generate a site with default options:
express auth-basic
The output of that command will show you the generated files:
Now let’s install the module express-basic-auth that will do the magic.
npm install --save express-basic-auth
Modify the module /routes/users.js
var express = require('express');
var router = express.Router();
const basicAuth = require("express-basic-auth");
const authOptions = {
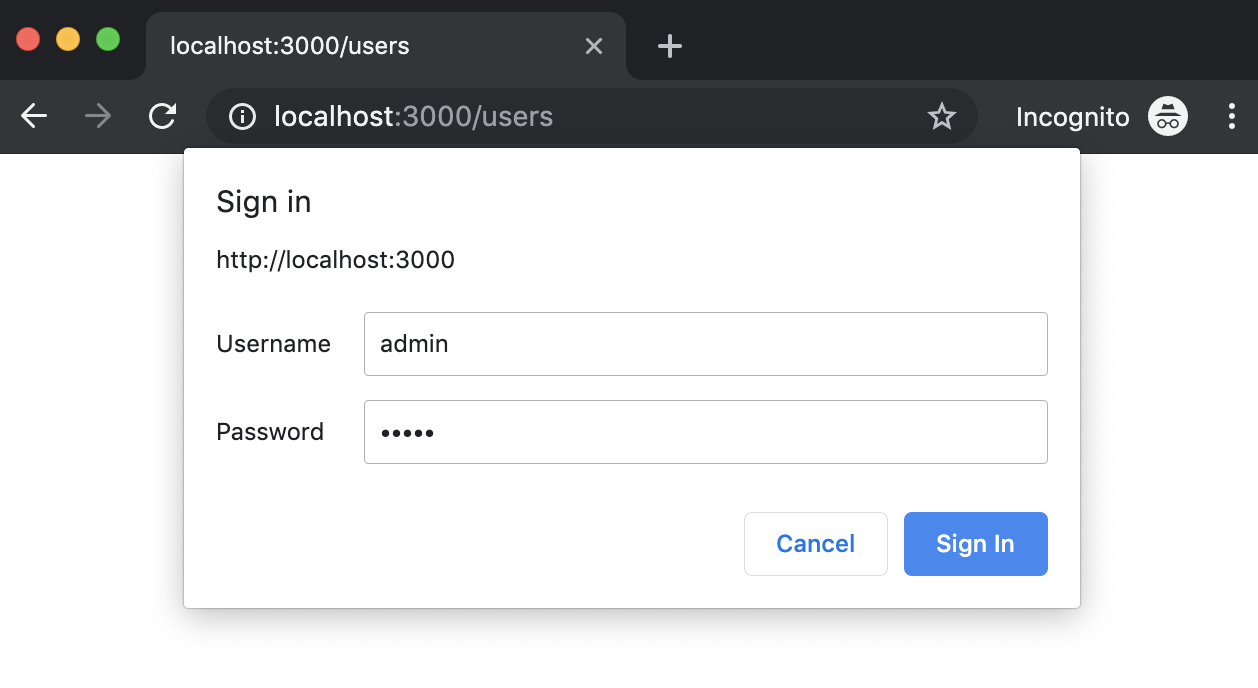
challenge: true, //it will cause most browsers to show a popup to enter credentials on unauthorized responses,
users: {"admin": "admin"},//typically you will get this info from environment variables or any other source
authorizeAsync: false,
unauthorizedResponse: getUnauthorizedResponse,
};
/**
*
* @param req
* @returns {string} the text to be displayed when users hit on cancel prompt button
*/
function getUnauthorizedResponse(req) {
return "Unauthorized";
}
/**
* GET users listing.
*/
router.get('/', basicAuth(authOptions), function(req, res, next) {
res.send('Users listing area');
});
module.exports = router;
You should see a prompt that asks you for credentials. Try click on cancel button and then refresh the page to introduce the credentials you wrote in the code.
If you are already a Salesforce developer then you know that server-side Apex Unit tests are required, but client-side JavaScript tests are not and if you are like most developers, you probably think that creating tests should be optional, kind of like documenting, right?
This will be the sixth of a series of posts I will be doing over the next few weeks. They will all lead up to the introduction of my new course in December 2019 titled, “Building Your First Lightning Web Component for Salesforce” from Pluralsight. These posts will contain final code snippets of the code used in each course module, but will not include all the tips and best practices about using Visual Studio Code and SFDX, along with the way I personally approach teaching in my video courses.
Handling Testing and Wrapping Up
If you are already a Salesforce developer then you know that server-side Apex Unit tests are required, but client-side JavaScript tests are not and if you are like most developers, you probably think that creating tests should be optional, kind of like documenting, right?
You might not believe this, but writing tests (even for non-required JavaScript)…
A sitemap is very important if you want to search engines discover and index your site properly. Your site is a jungle of HTML, CSS and JavaScript files so the more you make it easier for search engines, the better. A sitemap.xml file is one of the most and easiests way to implement.
No matter the language you are using in your site, this is the right way to create a sitemap.
A sitemap is a file that search engines like Google Bot can understand to index your site. This file contains all the links to your pages in a special (but not so complicated) format.
It contains also an important information: how often you update that specific page. This way the bot will visit periodically to index the new changes.
The Sitemap protocol format consists of XML tags. All data values in a Sitemap must be entity-escaped. The file itself must be UTF-8 encoded.
The above sitemap only contains one page: the home page. Maybe that’s ok because your site only contains a landing page but let see how do we build a sitemap with more pages.
If you have more pages to index you will write a new block:
If you are using WordPress or any other CMS, probably you will have several plugins to generate your sitemap.xml with one click and (automatically) every time you create new content. Otherwise you will have to create an algorithm by your own.
This just in: Google doesn’t want to block third-party cookies in Chrome right now. It has promised to make them obsolete later, though. Wait – what? The search engine giant gave us the latest update this week in the journey towards what it says will be a more private, equitable web. It announced this initiative, […]
Unfortunately, you cannot use async property here since the script must be loaded before the page loads
Add this code in your page
<script type = "text/javascript">
  // I assume you are using jQuery. Otherwise you can use the classic way
  $(document).ready(() => {
      // to load images in a lazy way
      // lazy loads elements with default selector as '.lozad'
      const observer = lozad();
      observer.observe();
      console.info('lozad observing...');
  });
</script>
Of course you can move this code to a different script file (let say common.js) instead of your page. You only have to make sure that your file common.js is downloaded and ready to use before lozad call:
const observer = lozad();
observer.observe();
The last step is to modify all your images you want to load lazily.
It’s important you add alt="your image description" because that text will be displayed while the image is loading. This will give a better user experience to your visitors.
The first step will be to create a method to guess if the HTTP request comes from HTTP or HTTPS (secure or not secure). In some context like AWS or Heroku you will have to ask by the header x-forwarded-proto instead of req.secure.
Have in mind that req.secure will return always false if there is a load balancer that redirects internally through HTTP. So let’s contemplate both scenarios
/**
 * @param req express http request
 * @returns true if the http request is secure (comes form https)
 */
function isSecure(req) {
  if (req.headers['x-forwarded-proto']) {
    return req.headers['x-forwarded-proto'] === 'https';
  }
  return req.secure;
};
And then add this code in you app.js. Have in mind we are not redirecting to HTTPS if we are in our development or testing environment but you can skip them if you want and redirect always.
// redirect any page form http to https
app.use((req, res, next) => {
  if (process.env.NODE_ENV !== 'development' && process.env.NODE_ENV !== 'test' && !isSecure(req)) {
    res.redirect(301, `https://${req.headers.host}${req.url}`);
  } else {
    next();
  }
});
Now all requests will be redirected to HTTPS if you access through HTTP regardless the full URL
Generating a 2048 bit RSA private key
...........+++
............................+++
writing new private key to 'keytmp.pem'
Enter PEM pass phrase:
Verifying - Enter PEM pass phrase:
-----
You are about to be asked to enter information that will be incorporated
into your certificate request.
What you are about to enter is what is called a Distinguished Name or a DN.
There are quite a few fields but you can leave some blank
For some fields there will be a default value,
If you enter '.', the field will be left blank.
-----
It will ask you some data such as country, city, organization etc. You can introduce whatever you want because you will use this stuff locally. If you are configuring a production environment, of course you will have to write real data.
IMPORTANT: Remember the passphrase you used because you will need in the following step
List the current directory to see the generated files
$ ls
cert.pem	keytmp.pem
Get decrypted keys
$ openssl rsa -in keytmp.pem -out key.pem
List files
$ ls
cert.pem	key.pem		keytmp.pem
Now we can use our files in our app
I created two environment configs to keep the keys in a different directory rather than in my project: KEY_PEM and CERT_PEM
const fs = require('fs');
const key = fs.readFileSync(process.env.KEY_PEM); //absolute path to the key.pem file
const cert = fs.readFileSync(process.env.CERT_PEM); //absolute path to the cert.pem file
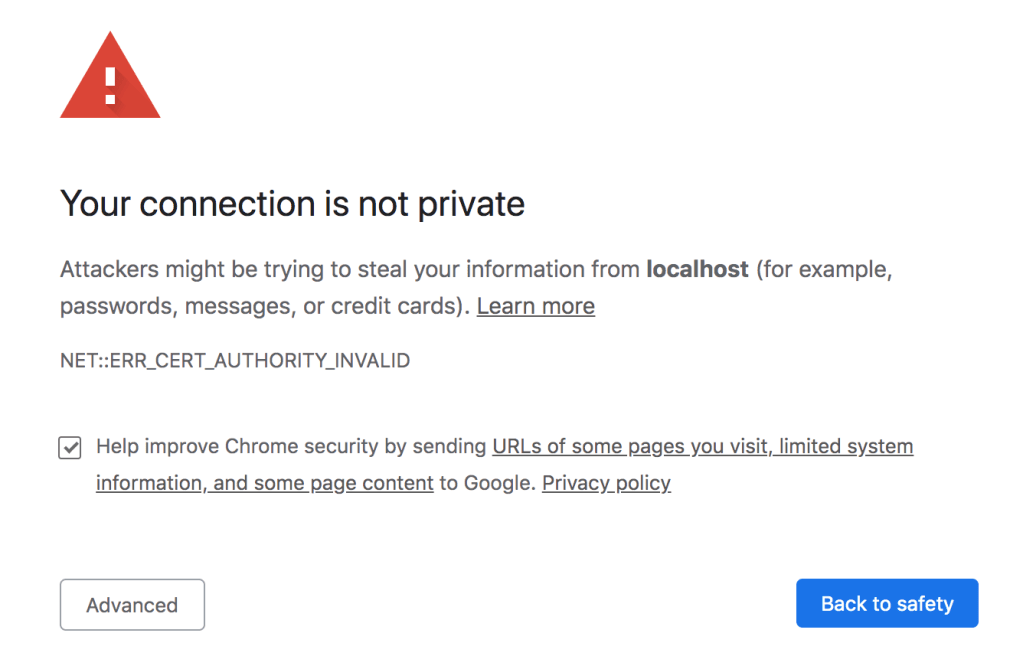
After running your server, 99% you will get a big warning from your browser:
Chrome certificate error
Don’t worry, you can click on Advanced and then click on Proceed to localhost (unsafe)
That’s because the browser does not recognize your certificate as trusted. Remember we created it and it comes from our machine and not from an established certificate authority
As Engineer I installed WordPress many times, facing issues such as performance and security. When you host WordPress by your own, security is a headache because it’s a super known tool with lots of exploits so you receive strange HTTP requests all the time, trying take advantage of some vulnerability.
To delegate is something you learn over the time and to host the things you build is maybe the first thing you should think to delegate.
WordPress.com offers the possibility to host your instance and depending on your business you have different plans that give you more or less flexibility. I will describe 5 reasons that I consider when I need to implement a CMS (Content Management System) solution.
1 – Popularity
One of the first question many people (including myself) asks is “who is using it?” And the answer is: a lot of people! That means that many sites you visit in a daily basis use WordPress, including this awesome blog 🙂
If you google “WordPress market share” you will get different numbers such as 30%, 40%. I don’t know exactly but at least 1% means a lot of sites.
Free and paid themes: you can change how your site looks like with just one click. And the most important: most of the themes are mobile friendly.
Total control when you host it since you have access to the source code
Plugins. There are literally one plugin for everything you need and most of them are free or at least a free entry level.
Monetize. Paid or self hosted you can install ads to monetize your site. In my case my plan allows me to add ads with more or less flexibility.
3 – SEO
You may write awesome content but will be kind of hidden if searching bots can’t read your site properly. The good news is most of the themes are SEO friendly so you won’t have to worry about that. Anyway , standards and the way Google scans your site changes over the time so it’s a good practice to be updated once a year what are the new tags / best practices to be implemented.
You can have your wordpress site just for free. Just create an account at wordpress.com and start writing your content. Paid plans allows you, among other tings:
Monetize
Your site under your own domain: example.com
Install more advanced plugins
Edit layouts by adding pre-built widgets
5 – Awesome editor
To write content is a pleasure, the Gutenberg editor is awesome!
You don’t need to touch html to make your magic like in old times.