Are you looking to add a bit of personality and flair to your lightning data table? Conditional cell color gives designers and developers the opportunity to transform their table into something unique and eye-catching.
With conditional cell color, you are able to control the color of a cell and its contents based on the value of a particular item in the table. This means that each cell in a row can have its own distinct color, letting you highlight important information, emphasize data, and make the table look more visually appealing.
Expected result
Salesforce Lightning is a component-based framework for building user interfaces on the Salesforce platform. It provides a modern and efficient way for developers to create and deploy custom user interfaces that can run on any device, including desktops, laptops, tablets, and smartphones.
A Lightning Component is a reusable unit of code that implements a specific feature or functionality. Components can be composed into larger applications and can be easily reused and customized to meet different business needs. They are written in Aura, a proprietary JavaScript-based language, and use the Lightning Data Service to communicate with the Salesforce server.
Lightning Components provide a number of benefits, including faster performance, improved user experience, and greater customization options compared to traditional Salesforce user interfaces. They are an essential part of the Salesforce Lightning platform and are widely used by organizations to build custom applications and extend the functionality of the Salesforce platform.
Lightning data tables allow users to customize the colors of cells in a table based on the values of the cell using conditional formatting. This is a powerful tool for quickly identifying trends and outliers in data sets. With Lightning data tables, Salesforce developers can set color thresholds to automatically color cells according to whether their value is above/below a certain value or between two values. This feature is especially useful for displaying numerical values such as sales data, which often need to be highlighted at a glance so that users can quickly identify areas for improvement.
Let say you want to highlight a cell in a Lightning data table (lightning:datatable) when a specific value is invalid. In our example, we want to display those invalid emails in red.
public class OpportunitiesTabController {

    @AuraEnabled
    public static void toLowerCase(Id opptyId){
        try{
            Opportunity opp = [SELECT Id, Name FROM Opportunity WHERE Id = :opptyId];
            opp.Name = opp.Name.toLowerCase();
            update opp;
        }catch(Exception e){
            throw new AuraException(e.getMessage());
        }

    }

    @AuraEnabled
    public static void toUpperCase(Id opptyId){
        try{
            Opportunity opp = [SELECT Id, Name FROM Opportunity WHERE Id = :opptyId];
            opp.Name = opp.Name.toUpperCase();
            update opp;
        }catch(Exception e){
            throw new AuraException(e.getMessage());
        }
    }


    @AuraEnabled
    public static List getOpportunities(){
        return [SELECT Id, Name, StageName, CreatedDate, Account.Name, AccountId
                FROM Opportunity ORDER BY CreatedDate DESC LIMIT 10];
    }
}
If you’re an administrator of a Salesforce org, you need to know how your users are interacting with your Visualforce pages. With Salesforce VisualforceAccessMetrics, you can easily get usage stats for your Visualforce pages and track page performance.
VisualforceAccessMetrics is a tool that lets you see which Visualforce pages are being accessed, how long users are staying on the page, and the page performance status. The data from VisualforceAccessMetrics can be used to optimize page performance and provide a better user experience.
If you want to know how frequently your Visualforce pages are accessed, you just have to run a simple query on VisualforceAccessMetrics:
SELECT ApexPageId,DailyPageViewCount,Id,MetricsDate
FROM VisualforceAccessMetrics
More options
SELECT ApexPageId, MetricsDate, TotalTime, AverageTime, TotalRequests, UniqueUsers
FROM VisualforceAccessMetrics
WHERE MetricsDate = TODAY
Have in mind that query will return stats from the latest 90 days
Pageviews are tallied the day after the page is viewed, and each VisualforceAccessMetrics object is removed after 90 days.
But beware, that query could return deleted pages.
To fix that, let’s tweak the query to:
SELECT Id, Markup, Name, NamespacePrefix
FROM ApexPage
WHERE Id IN (SELECT ApexPageId FROM VisualforceAccessMetrics)
As you probably know, JavaScript buttons are not supported in Lightning Experience (LEX). In particular, you can’t use REQUIRESCRIPT.
In this post, the idea is to show how to migrate a particular JavaScript button that uses sforce.connection.query sentence.
Suppose our JavaScript button is like this:
{!REQUIRESCRIPT("/soap/ajax/37.0/connection.js")}
{!REQUIRESCRIPT("/soap/ajax/37.0/apex.js")}

var query ="SELECT Id, Name FROM Account LIMIT 10";
var queryRecords= sforce.connection.query(query);
var records = queryRecords.getArray("records");
//Do something with the records...
A Lightning equivalent solution requires several steps. I assume that you have some knowledge about Lightning Components development as well as Apex development.
Well, let’s go!
Create a Lightning component called MyQueryResult and Its JavaScript controller
MyQueryResult.cmp
<aura:component controller="MyQueryResultService" >
    <aura:attribute name="queryResult" type="SObject[]" />
    <aura:handler name="init" value="{!this}" action="{!c.doInit}"/>

    <!-- It just displays the results. Modify It depending on your needs -->
    <aura:iteration items="{! v.queryResult}" var="item">
        {!item.Id} - {!item.Name}<br/>
     </aura:iteration>
</aura:component>
MyQueryResult.js
({
    doInit : function(component, event, helper) {
        var myQuery = 'SELECT Id, Name FROM Account LIMIT 10';
        var action = component.get("c.executeQuery");
        action.setParams({
            "theQuery": myQuery
        });
        action.setCallback(this, function(response) {
            var state = response.getState();
            if(state == "SUCCESS" && component.isValid()){
                console.log("success") ;
                var queryResult = response.getReturnValue();
                console.log(queryResult);
                component.set("v.queryResult", queryResult);
            }else{
                console.error("fail:" + response.getError()[0].message);
            }
        });
        $A.enqueueAction(action);
    }
})
We will need also a service (an Apex class) to execute our query
MyQueryResultService
public class MyQueryResultService {

    @AuraEnabled
    public static List executeQuery(String theQuery){
        try{
            String query = String.escapeSingleQuotes(theQuery);
            return Database.query(query);
        }catch(Exception e){
            throw new AuraHandledException('Error doing the query: '+theQuery+' Error: '+e.getMessage());
        }
    }
}
After that, we need a quick action pointing to our component.
The last step is to add our quick action to the layouts we need
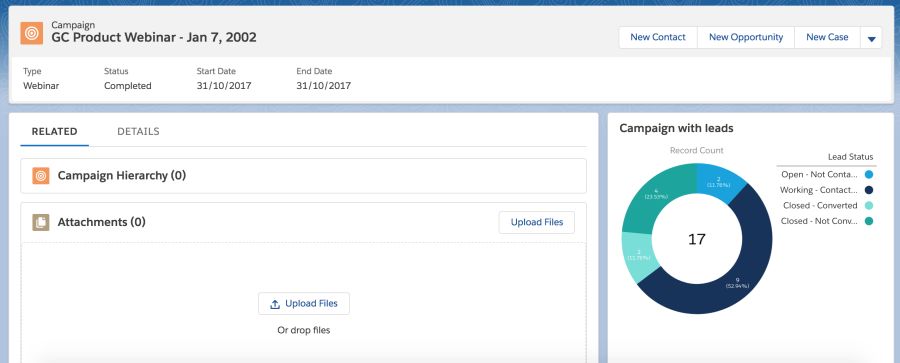
What about if we add a component with a pie chart on the Campaign object’s record page? It’s very useful to see how the campaign is going in terms of leads’ statuses. So we want to know the percentage of leads converted, not converted, contacted, etc.
I will use Lightning in a Developer org that I just created to take advantage of its default data. So let’s go!
Assumption
You are familiar with a Salesforce org, Lightning and you have created some reports in the past. If you haven’t created any report yet, you can read this module in Trailhead: Reports & Dashboards for Lightning Experience
Add leads to a campaign
First of all, let’s add some leads to a campaign. You only have to add leads to a campaign, you don’t have to create any data.
Create the report
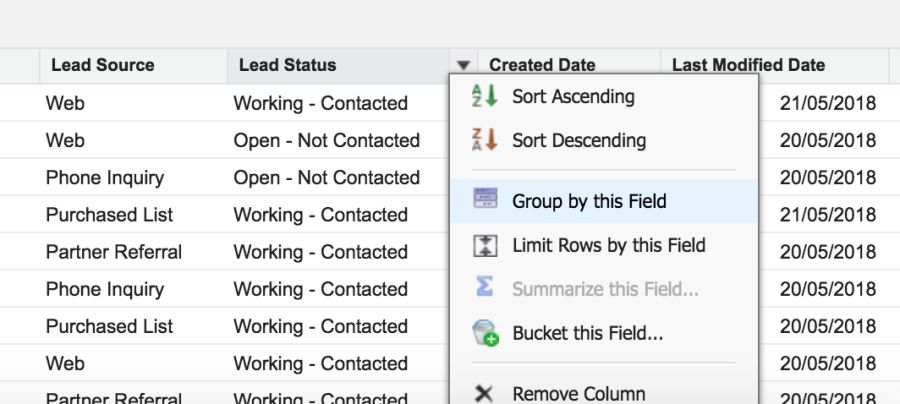
Go to Reports, New Report, expand Campaigns, select Campaign with leads and click on Create.
Drag Lead status field and group by this field
Save the report with the name you want and, importantly, in a public folder.
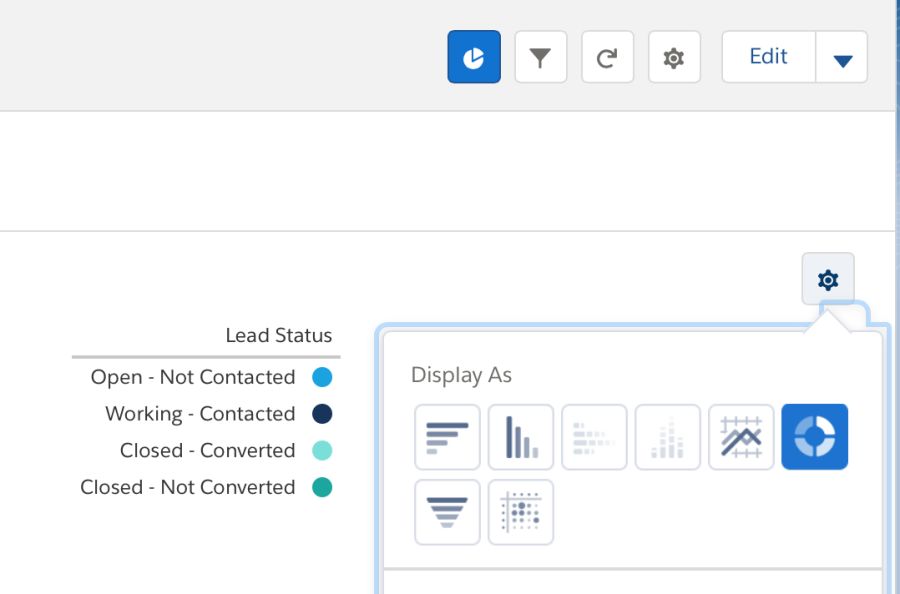
Run the report and add a pie chart. Don’t forget to save it.
Add the report component
Now let’s add our report to the Campaign’s record page.
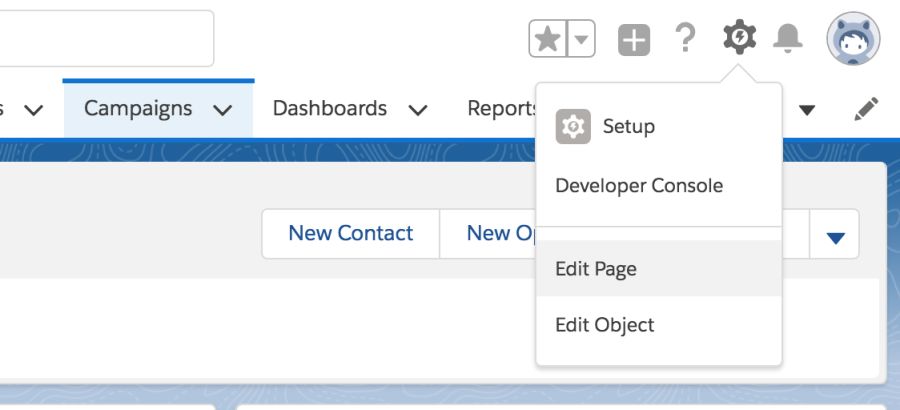
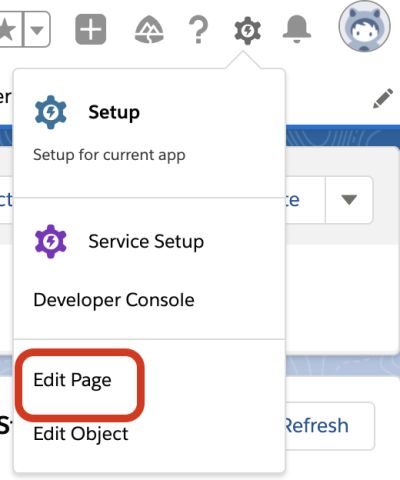
Open any campaign and Edit Page to open the App Builder.
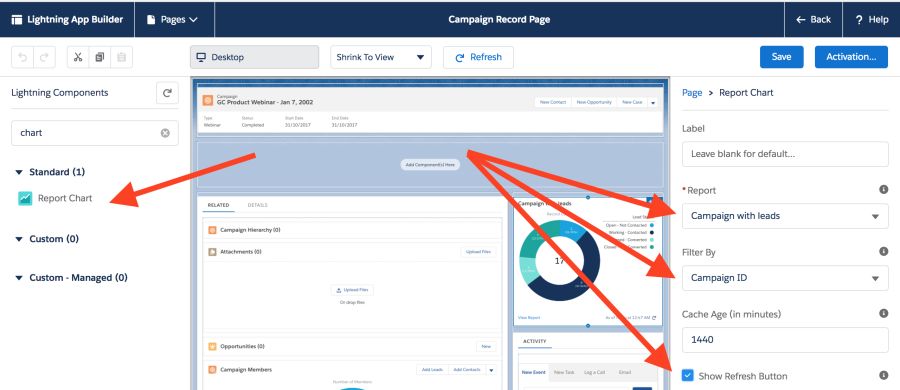
Drag the Report Chart component and set those parameters
Save the page and press Back to see the record page again with the report
In the example above we want to invoke the method myExecuteMethod that belongs to the Apex class JSMMyExecuteClass and you will pass these parameters {param1:”Im param1″,param2:”Im param2″}
After that, it redirects to google.com
There’s not a direct solution (aka point and click) so we have to work a little bit
Let say you have a Lightning Component placed on the Account record page and you want to listen to changes that occur outside our component. For example, in your component, you display some Account data and that must be refreshed once the user clicks on the standard save button.
We are going to write an example to show how we can accomplish this.
So we need to:
Create a Lightning Component
Create a Lightning Component controller
Create an Apex class to simuate some backend work
Example of listening to changes outside our component
Let’s create an example to see how it works.
For sake of simplicity, this component just displays the name of the Account that we get from an Apex controller
Now we want our Lightning Component to be updated once the Account’s name was changed through the standard layout.
Create a component
It’s important to check the “Lightning Record Page” to receive the record id by URL parameter and also to be able to place this component into the Account record page.
<aura:component controller="MyAccountComponentController" implements="flexipage:availableForRecordHome,force:hasRecordId" access="global" >
    <aura:handler name="init" value="{!this}" action="{!c.doInit}"/>
    <aura:attribute name="recordId" type="String" />
    <aura:attribute name="accountName" type="String" />

    <!-- To listen to when the Account was changed and update our component -->
    <force:recordData aura:id="forceRecord"
                      recordId="{!v.recordId}"
                      fields="Name"
                      recordUpdated="{!c.doInit}" />

    <article class="slds-card">
        <div class="slds-card__body slds-card__body_inner">
            <span class="slds-text-body_regular">{!v.accountName}</span>
        </div>
    </article>
</aura:component>
In our example, we are not asking for the event type but we could this way tho make different actions
if (changeType === "ERROR") { /* handle error; do this first! */ }
    else if (changeType === "LOADED") { /* handle record load */ }
    else if (changeType === "REMOVED") { /* handle record removal */ }
    else if (changeType === "CHANGED") { /* handle record change */ }
Create the Apex controller
public class MyAccountComponentController {

    @AuraEnabled
    public static Account getAccount(String recordId){
        try{
            return [SELECT Name FROM Account WHERE Id = :recordId];
        }catch(Exception e ){
            throw new AuraHandledException('Error getting Account '+e.getMessage() + ' record id: '+recordId);
        }
    }
}
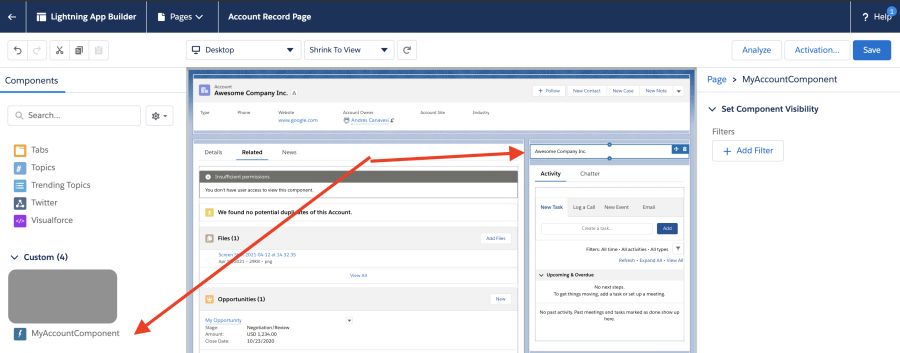
Add the component
After we create our Lightning Component, let’s add it to our Account’s record page
Drag and drop our Component. In this case, I’m positioning at the top of our side bar
Save the page and activate it if it is necessary.
Test it
Our last step is to change the name of any account and see how our component is updated.
Have in mind we are making an API call to our Apex controller. That change doesn’t come from the frontend, we have to go to our Salesforce backend and run the query to get the new name.
Reload record
In case we are in edit mode, we may call this method to reload our component based on new changes that come from outside
We can’t use $User, $Profile, $Label, and $Api in Lightning. We need to implement a server-side solution.
Migrating your code to Lightning Components can be a daunting task. Fortunately, with a few simple steps, you can migrate your $User, $Profile, $Label and $Api components to Lightning Components.
({
  doInit : function(component, event, helper) {
    var action = component.get("c.getUserInfo");
    action.setCallback(this, function(response) {
      var state = response.getState();
      if(state == "SUCCESS" && component.isValid()){
        console.log("success") ;
        var result = response.getReturnValue();
        console.log(result);
        console.log(result.FirstName);
        component.set("v.user", result);

   }else{
     console.error("fail:" + response.getError()[0].message);
    }
   });
  $A.enqueueAction(action);
}
})
Create an Apex class
A wrapper class containing the user info we need
public class JSMUserInfo{
  @AuraEnabled
  public String Id {get;set;}
  @AuraEnabled
  public String FirstName {get;set;}
  @AuraEnabled
  public String LastName {get;set;}
  @AuraEnabled
  public String Email {get;set;}
}
Create a service Apex class
The server-side controller that exposes the User’s info
public class JSMUserInfoService {

@AuraEnabled
public static JSMUserInfo getUserInfo(){
  try{
    JSMUserInfo info = new JSMUserInfo();
    info.Id = Userinfo.getUserId();
    info.FirstName = Userinfo.getFirstName();
    info.LastName = Userinfo.getLastName();
    info.Email = Userinfo.getUserEmail();
    return info;
  }catch(Exception e){
     throw new AuraHandledException(e.getMessage());
  }

  }
}
We can use a similar approach for $Api or any other global variable
$Profile
@AuraEnabled
public static Profile getProfileInfo(){
  try{
    String profileId = UserInfo.getProfileId();
    Profile profile = [SELECT Id, Name FROM Profile WHERE Id =:profileId];
    return profile;
  }catch(Exception e){
    throw new AuraHandledException(e.getMessage());
  }
}
$Site
@AuraEnabled
public static JSMSiteInfo getSiteInfo(){
  try{
    JSMSiteInfo info = new JSMSiteInfo();
    info.Prefix = Site.getPathPrefix();
    info.Domain = Site.getDomain();
    info.Name = Site.getName();
    return info;
  }catch(Exception e){
    throw new AuraHandledException(e.getMessage());
  }
}